【C++】オブジェクト指向プログラミング

カプセル化
- プログラムコードとプログラムコードが扱うデータを一体化して、外部の干渉から両者を保護するための仕組み。
- 実際にはprivateやpublicといった機能を使用する。publicはprivateの制御インターフェースを提供されるっために使われる。
ポリモーフィズム
継承
- 1つのオブジェクトがほかのオブジェクトの性質を獲得するプロセスのこと。
- オブジェクトは特定の性質を汎用セットとして受け継いだ上で、そのオブジェクトの機能を独自に追加できる。
- 例えば、家は「建物」という汎用クラスの一部、「建物」は「建築物」というクラスの一部、そして「建築物」は汎用的な「人工物」のクラスの一部
- どのクラスえも、小クラスは親クラスが持つ性質をすべて継承し、独自の性質を追加して定義
引用・参考はこちら

独習C++ 第4版
Amazon CAPTCHA
【ROS】tfを用いた座標変換
tfとは
- 座標系管理システム
- ROSでは順運動学の問題にtfを使用している
tfの特徴
- 時間動機ができる
- 分散システムが使える
- rvizとの連携が強力
以下のようなものを作る場合には必須
- 自立移動ロボット
- 複数の関節を持つロボットアーム
- 3次元物体の認識プログラム
$ roslaunch pr2_gazebo pr2_empty_world.launch
$ cd catkin_ws/src/
$ git clone https://github.com/OTL/ez_utils.git
$ cd ../
$ catkin_make
$ rosrun rviz rviz
表示させるものをいい感じに選択する(下の画像の左メニューを参考に)


そして、TFの「head_plate_frame」と「I_gripper_led_frame」にチェックを入れる

するとこのように、必要なものだけを表示させることができる
相対関係を取得する
- /head_plate_frameが頭
- /I_gripper_led_frameが左手先
tf_echoでこれらのフレーム間の相対位置を調べることができる
$ rosrun tf tf_echo /head_plate_frame /l_gripper_led_frame
At time 817.691
- Translation: [0.756, 0.188, -0.271]
- Rotation: in Quaternion [-0.002, -0.391, 0.000, 0.920]
            in RPY (radian) [-0.005, -0.803, 0.003]
            in RPY (degree) [-0.286, -46.031, 0.167]
そして、look_hand.pyを作成する
#!/usr/bin/env python
import rospy
import tf2_ros
from ez_utils.ez_joints import EzJoints

if __name__ == "__main__":
    rospy.init_node( 'pr2_look_left_hand' )
    tf_buffer = tf2_ros.Buffer()
    tf_listener = tf2_ros.TransformListener( tf_buffer )

    # make EzJoints instance and this topic to Publish
    head = EzJoints( '/head_traj_controller' )
    left_arm = EzJoints( '/l_arm_controller' )

    yaw_angle = 0.0 # init
    pitch_angle = 0.0 # init
    rate = rospy.Rate(10.0)
    while not rospy.is_shutdown():
        try:
            trans = tf_buffer.lookup_transform( 'head_plate_frame', 'l_gripper_led_frame', rospy.Time() )

            # decide angle
            yaw_angle = trans.transform.translation.y / 1
            pitch_angle = -trans.transform.translation.z / 1

            print trans.transform.translation
            head.set_positions( [yaw_angle, pitch_angle] ) # Send angle
        except ( tf2_ros.LookupException, tf2_ros.ConnectivityException, tf2_ros.ExtrapolationException ):
            rospy.logwarn( 'tf not found' )
        rate.sleep()
- 4行目:EzJointsを使うとPR2の関節を簡単に動かすことができる
- 8、9行目:TFのデータを蓄えるバッファを作成し、引数にしてTransformListenerを作り、tf_listenerに代入する。このtf_listenerを使用してTFの機能にアクセスする
- 20行目:指定したフレーム間の相対関係を取得する。rospy.Time()は取得可能な最新の時間。また、この関数lookup_transformは失敗すると例外を投げるため、try, exceptで例外処理をする
$ chmod 755 look_hand.py
$ rosrun ros_start look_hand.py
$ rosrun rqt_ez_publisher rqt_ez_publisher

- topicを選択
- スライダを増やすために+をクリックする
これで上の画像のようになる。
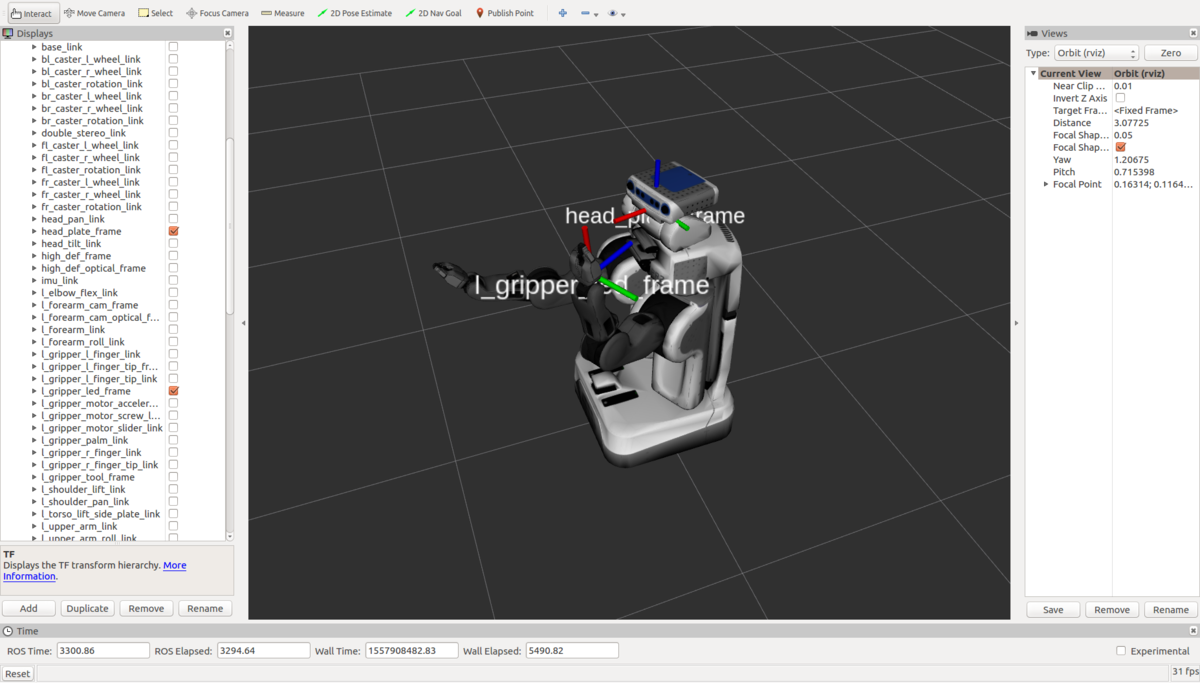
この時、PR2このように顔が手の方向を向いていることが分かる。
【ROS】rviz・rqt_plot
rviz
ROSの可視化といえばrviz
$ rosrun rviz rviz
で起動
Turtlebotのシミュレータを使用してみる
$ sudo apt-get install -y ros-kinetic-turtlebot-gazebo
$ source ~/.bashrc
$ roslaunch turtlebot_gazebo turtlebot_world.launch
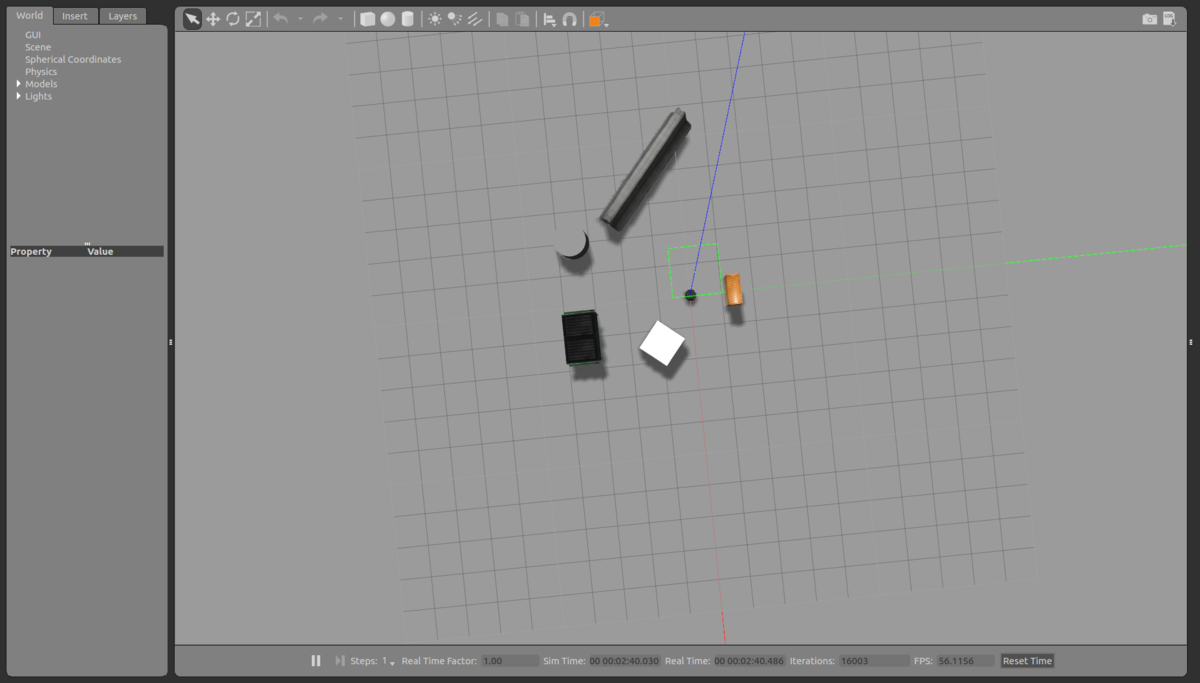
$ roslaunch turtlebot_gazebo amcl_demo.launch
$ rosrun rviz rviz
- 左下のAddをクリック
- RobotModelを選択

すると、TurtleBotが表示される
- Addをクリックし、ByTopicタブを選択
- /mapのmapを選択し、OKをクリック

この地図は予め製作されたもので、Gazeboの画面と比較すると同じようになっていることが分かる。
次に/camera/depth/pointsを追加する。
- AddからBy topicを選択し、/camera/depth/pointのPointCloud2を選択する

次にKinectのセンサ情報をロボットの現在位置に重ねる
- /odom/Odometry
- /move_base/NavfnROS/plan/path
を追加する。

赤い矢印がロボットモデルに重ねて表示される
この画面で、左のメニューのOdometryを開きCovarianceのチェックを外す
このようにrvizではPublishされているTopicから表示したいTopicを選択すると3次元的に表示させることができる
要するに、rostopic echoで表示される文字列がrvizで可視化できる
また、rvizでは出力だけでなく入力もできる

上のメニューの2D Nav Goalを選択し、

このように矢印をひっぱりると

このように赤い矢印が表示される。

別の角度で実行してみると、緑の線が出ていることも分かる。
赤い矢印が履歴として表示され、緑の細い線(/move_base/navfnROS/plan)がロボットがどこに移動使用しているのかを表している。
rqt
- Robot + Qt のこと
- Qtはマルチプラットフォームに対応したGUIのフレームワーク
- rqtはQtを使用したロボットのGUIフレームワーク
- rqt_graphやrqt_consoleなどがある
rqt_ez_publisherを使う
Topicをスライダーなどを使ってpublishできる
$ sudo apt-get isntall ros-kinetic-rqt-ez-publisher
$ roscore
$ rosrun turtlelesim turtlesim_node
$ rosrun rqt_ez_publisher rqt_ez_publisher
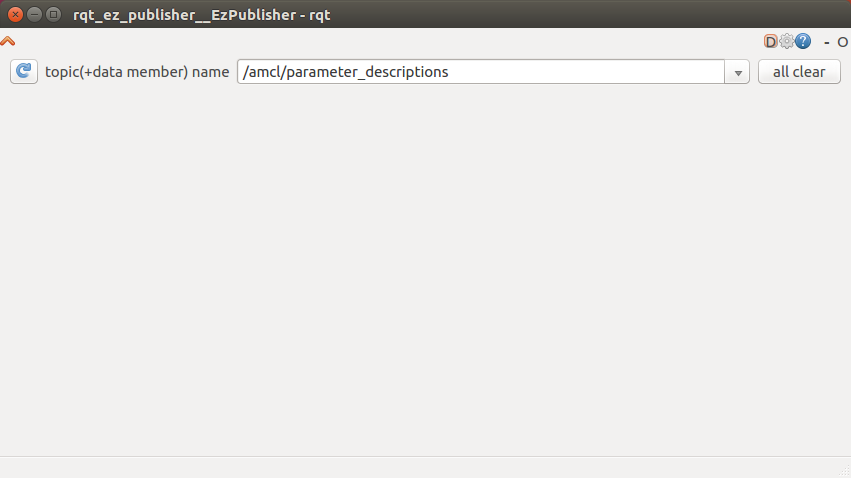
そして、/turtle1/cmd_velを選択

- 画面を最大化するとスライダーを動かしやすくなる
- このGUIで亀を動かすことができる
- スライダを動かすたびにMessageがpublishされる
rqt_plotを使ってみる
$ rqt_plot

Topic名と変数を繋いで書くことでPlotしたい要素を指定

リアルタイムで描画される
【ROS】pythonライブラリの作成
ライブラリを置くための準備
- ROSではpythonのライブラリを「パッケージ名/src/パッケージ名」におく
前回の記事で作ったbumper_action.pyを移動する
$ mkdir -p src/ros_start
$ cp scripts/bumper_action.py src/ros_start/
ディレクトリをライブラリと認識させるために、__init__.pyを配置する。
$ touch src/ros_start/__init__.py
ROSのパッケージシステムでこのライブラリを認識させるための設定をする。
~/catkin_ws$ vi src/ros_start/setup.py
from distutils.core import setup
from catkin_pkg.python_setup import generate_distutils_setup

setup_args = generate_distutils_setup(
    packages = [ 'ros_start' ],
    package_dir = { '': 'src' },
)

setup (**setup_args )
CMakeLists.txtの編集
catkin_python_setup()
のコメントアウトを解除
$ cd ~/catkin_ws/
$ catkin_make
ライブラリを使う
~/catkin_ws/src/ros_start/scripts$ vi bumper_action_use_lib.py
#!/usr/bin/env python
import rospy
from ros_start.bumper_action import BumperAction

if __name__ == '__main__':
    rospy.init_node( 'bumper_action_use_lib' )
    bumper_action = BumperAction()
    rospy.spin()
$ chmod 755 bumper_action_use_lib.py
$ roscd ros_start/
$ cp scripts/bumper_client.py src/ros_start/
$ vi scripts/bumper_client_use_lib.py
#!/usr/bin/env python
import rospy
from ros_start.bumper_client import go_until_bumper
rospy.init_node( 'bumper_client_use_lib')
go_until_bumper()
$ chmod 755 scripts/bumper_client_use_lib.py
確認
$ rosrun ros_start bumper_action_use_lib.py
$ rosrun ros_start bumper_client_use_lib.py
[INFO] [1557815823.296143, 10.460000]: bumper hit!
結果はライブラリを使わないものと同様
ちなみに、今現在のディレクトリ構成は以下のようになっているはず
ros_start
├── CMakeLists.txt
├── action
│   └── GoUntilBumper.action
├── include
│   └── ros_start
├── launch
│   ├── chat.launch
│   └── param.launch
├── package.xml
├── scripts
│   ├── bumper_action.py
│   ├── bumper_action_use_lib.py
│   ├── bumper_client.py
│   ├── bumper_client_use_lib.py
│   ├── listener.py
│   ├── service_client.py
│   ├── service_server.py
│   ├── talker.py
│   ├── vel_bumper.py
│   ├── vel_publisher.py
│   ├── velocity_client.py
│   └── velocity_server.py
├── setup.py
├── src
│   └── ros_start
│       ├── __init__.py
│       ├── bumper_action.py
│       ├── bumper_action.pyc
│       ├── bumper_client.py
│       └── bumper_client.pyc
└── srv
    └── SetVelocity.srv
【ROS】Actionlibで時間のかかる処理を実行
- 最初にこれまでのおさらい
- TopocのPublisherとSubscriberは、非同期のデータフロー
- Serviseは同期通信
- Actionlibは、どの司令に対する結果なのかや、実行中のフィードバックを返すことができる
- 例えば、自立移動の命令を送り、移動が終わった時に結果が失敗か成功かを即座に知ることができる
- Serviceは処理が終わるまで待つことができるが、その間は呼び出し側のプログラムはブロックとして停止する欠点
- 例えば、自立移動の命令を送り、移動が終わった時に結果が失敗か成功かを即座に知ることができる
$ roscd ros_start/
$ mkdir action
$ vi action/GoUntilBumper.action
geometry_msgs/Twist target_vel
int32 timeout_sec
---
bool bumper_hit
---
geometry_msgs/Twist current_vel
- 1つめのブロック
- 「Goal」と呼ばれる。引数のようなもので、目的地を表す。
- 2つめのブロック
- 「Result」と呼ばれる。成否を主に返す
- 3つめのブロック
- 「Feedback」と呼ばれる。途中経過として返したい情報を発行
CMakeLists.txtの編集
find_packageを下のように編集。前回からactionlib_msgsとgeometry_msgsを加えただけ。
find_package(catkin REQUIRED COMPONENTS
  roscpp
  rospy
  std_msgs
  message_generation
  actionlib_msgs
  geometry_msgs
)
add_action_filesを以下のように書き換える
## Generate actions in the 'action' folder
add_action_files(
   FILES
   GoUntilBumper.action
)
generate_messagesにgeometry_smgsとactionlib_msgsを書き加える
## Generate added messages and services with any dependencies listed here
generate_messages(
   DEPENDENCIES
   std_msgs
   geometry_msgs
   actionlib_msgs
):
$ cd ~/catkin_ws/
$ catkin_make
以下のようにmsgsファイルが表示されていれば正常
$ ls devel/share/ros_start/msg/
GoUntilBumperAction.msg          GoUntilBumperFeedback.msg
GoUntilBumperActionFeedback.msg  GoUntilBumperGoal.msg
GoUntilBumperActionGoal.msg      GoUntilBumperResult.msg
GoUntilBumperActionResult.msgb
Action Serverの作成
~/catkin_ws/src/ros_start/scripts$ vi bumper_action.py
#!/usr/bin/env python
import rospy
import actionlib

from geometry_msgs.msg import Twist
from kobuki_msgs.msg import BumperEvent

from ros_start.msg import GoUntilBumperAction
from ros_start.msg import GoUntilBumperResult
from ros_start.msg import GoUntilBumperFeedback

class BumperAction( object ):
    def __init__( self ):
        # make ***Pulisher***  and  ***Subscriber***
        self._pub = rospy.Publisher( '/mobile_base/commands/velocity', Twist, queue_size = 10 )
        self._sub = rospy.Subscriber( '/mobile_base/events/bumper', BumperEvent, self.bumper_callback, queue_size = 1 )

        # Get maximum speed from parameter( defalut: 0.5)
        self._max_vel = rospy.get_param( '~max_vel', 0.5 )

        # make Action's server.
        ## action's name: bumper_action
        ## type: GoUntilBumperAction
        ## exuecute_cb: Server to actually run
        ## auto_start: auto start ( false )
        self._action_server = actionlib.SimpleActionServer( 'bumper_action', GoUntilBumperAction, execute_cb = self.go_until_bumper, auto_start = False )

        # Initialize variables to determine if the bumper is hit
        self._hit_bumper = False

        # start
        self._action_server.start()

    def bumper_callback( self, bumper ): # when the bumper hits
        self._hit_bumper = True

    def go_until_bumper( self, goal ): # Action's server
        print( goal.target_vel )
        r = rospy.Rate( 10.0 ) # 10kHz
        zero_vel = Twist()
        # 1 second in 10 loops
        for i in range( 10 * goal.timeout_sec ): # timeout_sec is input by commands
            if self._action_server.is_preempt_requested(): # stop intruction
                self._action_server.set_preempted() # Send that action was blocked by user request
                break
            if self._hit_bumper:
                self._pub.publish( zero_vel )
                break
            else:
                if goal.target_vel.linear.x > self._max_vel:
                    goal.target_vel.linear.x = self._max_vel
                self._pub.publish( goal.target_vel ) # Publish
                feedback = GoUntilBumperFeedback( current_vel = goal.target_vel )
                self._action_server.publish_feedback( feedback ) # Pass an instance of GoUntilBumperFeedback class to publish_feedback()
            r.sleep()
        # Call set_succeeded() by inserting the result of bumper_hit into an instance of class GoUntilBumperResult
        result = GoUntilBumperResult( bumper_hit = self._hit_bumper )
        self._action_server.set_succeeded( result )

if __name__ == '__main__':
    rospy.init_node( 'bumper_action' )
    bumper_action = BumperAction()
    rospy.spin()
$ roscore
$ chmod 755 bumper_action.py
$ rosrun ros_start bumper_action.py
$ roslaunch kobuki_gazebo kobuki_playground.launch
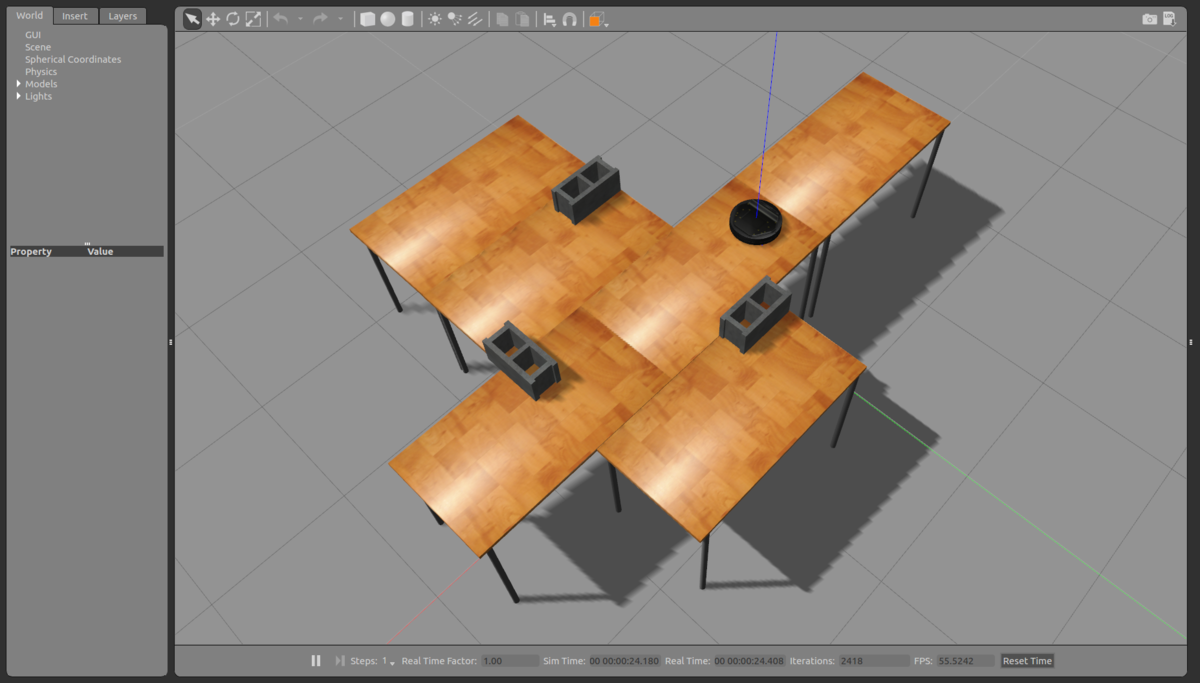
$ rosrun actionlib axclient.py /bumper_action

ここで、linearのxを0.8、timeout_secを10に書き換え、SEND GOALをクリックする。

ブロックに衝突して止まる

このとき、GUIのClientの画面はこのようになっているはず。bumper_hitがTrueになっているこを確認。
Action Clientの作成
~/catkin_ws/src/ros_start/scripts$ vi bumper_client.py
#!/usr/bin/env python
import rospy
import actionlib

from ros_start.msg import GoUntilBumperAction
from ros_start.msg import GoUntilBumperGoal

def go_until_bumper():
    # make Action's client
    #  name: bumper_action
    #  type: GoUntilBumperAction
    action_client = actionlib.SimpleActionClient( 'bumper_action', GoUntilBumperAction )

    action_client.wait_for_server() # Wait until the server is ready

    # Set GoUntilBumperGaol's instance
    goal = GoUntilBumperGoal()
    goal.target_vel.linear.x = 0.8
    goal.timeout_sec = 10

    action_client.send_goal( goal ) # Send data ( Publish to topic bumper_action/goal )
    action_client.wait_for_result() # wait for result

    result = action_client.get_result()
    if result.bumper_hit:
        rospy.loginfo( 'bumper hit!' )
    else:
        rospu.loginfo( 'faild!' )


if __name__ == '__main__':
    try:
        rospy.init_node( 'bumper_client' )
        go_until_bumper()
    except rospy.ROSInterruptException:
        pass
$ roslaunch kobuki_gazebo kobuki_playground.launch
$ rosrun ros_start bumper_action.py
$ chmod 755 bumper_client.py
$ rosrun ros_start bumper_client.py
[INFO] [1557812920.030237, 79.450000]: bumper hit!
やっていることはGUIを使った時と変わらないので、動作は同じ。
【ROS】Topic/Serviceの作成
独自のService型の製作
- 外部プログラムから速度(linear.xとangular.z)を指定して動かす
- 指定できる速度の値の範囲が決まっており、それ以上の速度は無視する
- 速度がセットできたか、無視されたかわかる
$ roscd ros_start
$ mkdir srv
$ vi srv/SetVelocity.srv
SetVelocity.srvに以下の4行を記入
float64 linear_velocity
float64 angular_velocity
---
bool success
ros_start直下のpackage.xmlの編集
<build_depend>message_generation</build_depend>
<exec_depend>message_runtime</exec_depend>
上の2つのコメントアウトを解除
CMakeLists.txtの編集
- find_packageにmessage_generationを書き加える
- add_service_filesを以下のように編集
## Generate services in the 'srv' folder
add_service_files(
   FILES
   SetVelocity.srv
)
- generate_messagesのコメントアウトを解除
$ cd ~/catkin_ws/
$ catkin_make
$ rossrv show ros_start/SetVelocity
float64 linear_velocity
float64 angular_velocity
---
bool success
うまくできていれば、SetVelocity.srvに書いた定義が出力されます。
ServiceServerの作成
$ roscd ros_start/scripts/
$ vi velocity_server.py
#!/usr/bin/env python

############### srv file adress #################
## ~/catkin_ws/src/ros_start/srv/SetVelocity.srv
#################################################

import rospy
from geometry_msgs.msg import Twist
from ros_start.srv import SetVelocity
from ros_start.srv import SetVelocityResponse

MAX_LINEAR_VELOCITY = 1.0
MIN_LINEAR_VELOCITY = -1.0
MAX_ANGULAR_VELOCITY = 2.0
MIN_ANGULAR_VELOCITY = -2.0

def velocity_handler( req ):
    vel = Twist()
    is_set_success = True

    if req.linear_velocity <= MAX_LINEAR_VELOCITY and ( req.linear_velocity >= MIN_LINEAR_VELOCITY):
        vel.linear.x = req.linear_velocity
    else:
        is_set_success = False

    if req.angular_velocity <= MAX_ANGULAR_VELOCITY and ( req.angular_velocity >= MIN_ANGULAR_VELOCITY ):
        vel.angular.z = req.angular_velocity
    else:
        is_set_success = False

    if is_set_success:
        pub.publish( vel )

    return SetVelocityResponse( success = is_set_success )


if __name__ == '__main__':
    rospy.init_node( 'velocity_server' )

    # Publish
    pub = rospy.Publisher( '/mobile_base/commands/velocity', Twist, queue_size = 10 )
    # Service
    service_server = rospy.Service( 'set_velocity', SetVelocity, velocity_handler )

    rospy.spin()
- 9、10行目はsrvであるSetVelocityと、その返り値のSetVrlocityResponseをインポート
- 17行目のvelocity_handlerはServiceが呼ばれた時に実行される関数。reqにはSetVelocityRequestの以下のようなインスタンスが入る
linear_velocity: 0.5
angular_velocity: 0.0
ServiceClientの作成
#!/usr/bin/env python
import rospy
from geometry_msgs.msg import Twist
from ros_start.srv import SetVelocity
import sys

if __name__ == '__main__':
    rospy.init_node( 'velocity_client' )

    # ServiceProxy to call Service
    set_velocity = rospy.ServiceProxy( 'set_velocity', SetVelocity )

    linear_vel = float( sys.argv[1] )
    angular_vel = float( sys.argv[2] )

    # Discrimination
    response = set_velocity( linear_vel, angular_vel )
    if response.success:
        rospy.loginfo( 'set[%f, %f] success' % ( linear_vel, angular_vel ))
    else:
        rospy.logerr( 'set[%f, %f] failed' % ( linear_vel, angular_vel ))
ServerとClinetを実行
$ roscore
$ chmod 755 velocity_server.py velocity_client.py
$ roslaunch kobuki_gazebo kobuki_playground.launch

$ rosrun ros_start velocity_client.py 0.5 0.0
[INFO] [1557723633.163754, 0.000000]: set[0.500000, 0.000000] success
rosserviceについて
$ rosservice list
でrosserviceの一覧を取得できる
$ rosservice call /set_velocity 1.0 0.0
success: True
このように、ServiceClientがなくても、Serviceを直接呼び出すことができる
$ rosservice info /set_velocity
Node: /velocity_server
URI: rosrpc://localhost:41959
Type: ros_start/SetVelocity
Args: linear_velocity angular_velocity
rosservice infoで方や引数に関する情報を見ることができる
rosserviceをクライアントの代わりに使用しデバッグを行うことができる
しかし、Serviceはrosbagで記録が取れないことや、rvizで可視化ができないため、可能な限りTopicを使用するほうが望ましい
【ROS】ServiceServerとServiceClientを作る
ServiceServerの作成
#!/usr/bin/env python
import rospy
from std_srvs.srv import Empty
from std_srvs.srv import EmptyResponse

def handle_service( req ):
    rospy.loginfo( 'called!' )
    return EmptyResponse()

def service_server():
    rospy.init_node( 'service_server' )
    s = rospy.Service( 'call_me', Empty, handle_service )
    print "Ready to serve."
    rospy.spin()

if __name__ == '__main__':
    service_server()
- 3行目:Serviceの型「std_srvs/Empty」をimport
- 4行目:Serviceを定義するEmptyと、返り値用のEmpty_Responseをimport
- handle_serviceは、Serviseを呼ばれた時に実行する関数
- 返り値はEmptyResponse()にしなければいけない
- rospy.spin()はServiceが呼ばれるのを待つ
ServiceClientの作成
#!/usr/bin/env python
import rospy
from std_srvs.srv import Empty

def call_service():
    rospy.loginfo( 'waiting service' )
    rospy.wait_for_service( 'call_me' )
    try:
        service = rospy.ServiceProxy( 'call_me', Empty )
        response = service()
    except rospy.ServiceException, e:
        print "Service call failed: %s" % e

if __name__ == "__main__":
    call_service()
- 6行目:logを使ってメッセージ表示
- 7行目:call_meのServerが立ち上がるのを待つ。TopicのPublisherとは違い相手がいないとエラーを吐く
- call_meという名前でstd_srvs/EmptyのServiceProxy、つまりSerciceClientを作っている
- SeviceProxyは関数オブジェクトー>関数のように使用可能
$ chmod 755 service_server.py service_client.py
$ roscore
$ rosrun ros_start service_server.py
$ rosrun ros_start service_client.py
これで、サーバ側(service_server.pyを実行した側)に
Ready to serve.
[INFO] [1557392599.541559]: called!
と表示されます。
