【ROS】kobukiでバンパーに反応するようにする・プログラムを他のロボットに使用
$ roslaunch kobuki_gazebo kobuki_playground.launch
この後にrostopic listでトピックを確認します。
$ rostopic list
/clock
/gazebo/link_states
/gazebo/model_states
/gazebo/parameter_descriptions
/gazebo/parameter_updates
/gazebo/set_link_state
/gazebo/set_model_state
/gazebo_gui/parameter_descriptions
/gazebo_gui/parameter_updates
/joint_states
/mobile_base/commands/motor_power
/mobile_base/commands/reset_odometry
/mobile_base/commands/velocity
/mobile_base/events/bumper
/mobile_base/events/cliff
/mobile_base/sensors/imu_data
/odom
/rosout
/rosout_agg
/tf
/tf_static
今回はこの中の「/mobile_base/events/bumper」を使用します。
$ vi vel_bumper.py
#!/usr/bin/env python
import rospy
from geometry_msgs.msg import Twist
from kobuki_msgs.msg import BumperEvent

rospy.init_node( 'vel_bumper' )
pub = rospy.Publisher( '/mobile_base/commands/velocity', Twist, queue_size = 10 )

def main():
    sub = rospy.Subscriber( '/mobile_base/events/bumper', BumperEvent, callback )

    while not rospy.is_shutdown():
        vel = Twist()
        direction = raw_input( 'f: forward, b: backward, l: left, r: right >' )
        if 'f' in direction:
            vel.linear.x = 0.5
        if 'b' in direction:
            vel.linear.x = -0.5
        if 'l' in direction:
            vel.angular.z = 1.0
        if 'r' in direction:
            vel.angular.z = -1.0
        if 'q' in direction:
            break
        print vel
        pub.publish( vel )

def callback( bumper ):
    print bumper
    vel = Twist() # make Twist type message
    vel.linear.x = -1.0
    pub.publish( vel ) #Publish


if __name__ == "__main__":
    main()
これで、ロボットがブロックにぶつかるとバックするようになると思います。
parameterを使う
#!/usr/bin/env python
import rospy
from geometry_msgs.msg import Twist
from kobuki_msgs.msg import BumperEvent

rospy.init_node( 'vel_bumper' )
pub = rospy.Publisher( '/mobile_base/commands/velocity', Twist, queue_size = 10 )

# get parameter
vel_x = rospy.get_param( '~vel_x', 0.5 )
vel_rot = rospy.get_param( '~vel_rot', 1.0 )

def main():
    sub = rospy.Subscriber( '/mobile_base/events/bumper', BumperEvent, callback, queue_size = 1 )

    while not rospy.is_shutdown():
        vel = Twist()
        direction = raw_input( 'f: forward, b: backward, l: left, r:right > ' )
        if 'f' in direction:
            vel.linear.x = vel_x
        if 'b' in direction:
            vel.linear.x = -vel_x
        if 'l' in direction:
            vel.angular.z = vel_rot
        if 'r' in direction:
            vel.angular.z = -vel_rot
        if 'q' in direction:
            break
        print vel
        r = rospy.Rate(10.0)
        for i in range(10):
            pub.publish( vel )
            r.sleep()

def callback( bumper ):
    back_vel = Twist()
    back_vel.linear.x = -vel_x
    r = rospy.Rate(10.0)
    for i in range(5):
        pub.publish( back_vel )
        r.sleep()


if __name__ == "__main__":
    main()
- コードの「~」は「プライベート・パラメータ」を表す。
- 「プライベート」はNodeの名前がつくため、「~」はノード名。
- 実行時に _vel_x:=1.0と引数を与えることで、プライベートパラメータをセットすることができる。
- vel_x = rospy.get_param( '~vel_x', 0.5 )のように0.5を入れているのは、引数として使用しなかった時の初期化用の値だという認識(間違っていたらご指摘お願いします。)
$ ./vel_bumper.py _vel_x:=1.0
launchファイルに記述する場合
<launch>
    <node pkg="ros_start" name="vel_bumper" type="vel_bumper.py">
        <param name="vel_x" value="1.0"/>
    </node>
</launch>
<param>の行に注目してください。
turtlesimを動かす
$ rosrun ros_start vel_bumper.py /mobile_base/commands/velocity:=/turtle1/cmd_vel

/mobile_base/commands/velocity:=/turtle1/cmd_velとして、vel_bumper.pyがPublishするトピックを実行時に変更
PR2に上記のプログラムを使用してみる
$ sudo apt-get install -y ros-kinetic-pr2-simulator
$ roslaunch pr2_gazebo pr2_empty_world.launch

$ rosrun ros_start vel_bumper.py /mobile_base/commands/velocity:=/base_controller/command

型やParameterが一致していれば、様々なロボットに使用することができる
【ROS】シミュレータでロボット駆動
$ sudo apt-get install -y ros-kinetic-kobuki-gazebo
$ roslaunch kobuki_gazebo kobuki_playground.launch

$ vi vel_publisher.py
#!/usr/bin/env python
import rospy
from geometry_msgs.msg import Twist #Used for robot speed command

rospy.init_node( 'vel_publisher' ) #node name

# Topicname : /mobile_base/commands/velocity
# Type : Twist
pub = rospy.Publisher( '/mobile_base/commands/velocity', Twist, queue_size = 10 )

while not rospy.is_shutdown():
    vel = Twist()
    # keybord inputs
    direction = raw_input( 'f: forward, b: backward, l: left, r: right >' )
    if 'f' in direction:
        vel.linear.x = 0.5
    if 'b' in direction:
        vel.linear.x = -0.5
    if 'l' in direction:
        vel.angular.z = 1.0
    if 'r' in direction:
        vel.angular.z = -1.0
    if 'q' in direction:
         break
    print vel
    pub.publish(vel)
$ chmod 755 vel_publisher.py
$ ./vel_publisher.py
f: forward, b: backward, l: left, r: right >f
linear:
  x: 0.5
  y: 0.0
  z: 0.0
angular:
  x: 0.0
  y: 0.0
  z: 0.0
f: forward, b: backward, l: left, r: right >fr
linear:
  x: 0.5
  y: 0.0
  z: 0.0
angular:
  x: 0.0
  y: 0.0
  z: -1.0

【ROS】launchファイルの作成
$ roscd ros_start
$ mkdir launch
$ vi launch/chat.launch
<launch>
    <node pkg="ros_start" name="talker" type="talker.py"/>
    <node pkg="ros_start" name="listener" type="listener.py"/>
</launch>
launchファイルはxmlで記述。
nodeタグは左から
・パッケージ名
・ノード名
・実行ファイル名
ROSの管理上は実行ファイル名ではなく、ノード名で管理される。
$ roslaunch ros_start chat.launch
$ rostopic list
/chatter
/rosout
/rosout_agg
$ rostopic echo /chatter
data: "hello world 1557123241.65"
---
data: "hello world 1557123241.75"
---
data: "hello world 1557123241.85"
---
data: "hello world 1557123241.95"
---
data: "hello world 1557123242.05"
---
rqt_graphでも確認できる
$ rqt_graph

【Ubuntu16.04】GUIとCLIが立ちあがらなくなった時の対処法
NVIDIAドライバを入れ直したら問題が発生した
GTX1060を積んだPCに間違ったバージョンをインストールしたら問題が発生しました。ドライバのバージョン430はGTX1060に対応していないためだと思います。
そのため、インストール後にrebootしたらUbuntuが使えなくなりました。
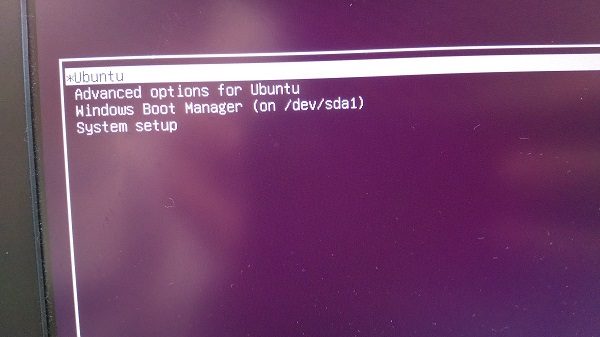
ここでUbuntuを選択すると画面やロゴはでてきますが、

数秒だけ
/dev/sda6: clean, 915706/14434304 files, 33393802/57723392 blocks
と表示され

このようにカーソルのようなものが表示されますが、一切キーボードの入力を受け付けません。
今回行った対処法をまとめたいと思います。
対処法
GNU grubの編集

この画面で[E]を押しGRUBの編集画面を開きます。
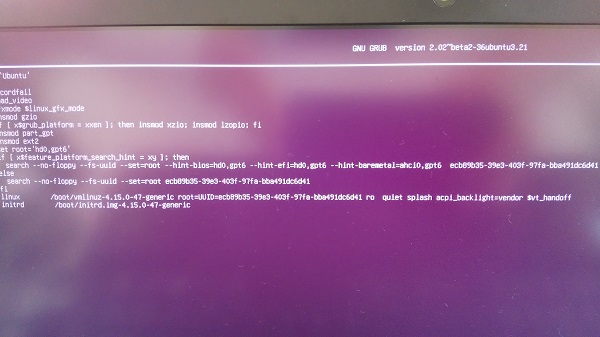
続いて「quiet splash」の横にスペースを空けて「nomodeset」を追記します。そして[F10]を押します。
再起動し、これで解決する可能性はありますが、しない場合は以下も実行してください。
リカバリモードで起動
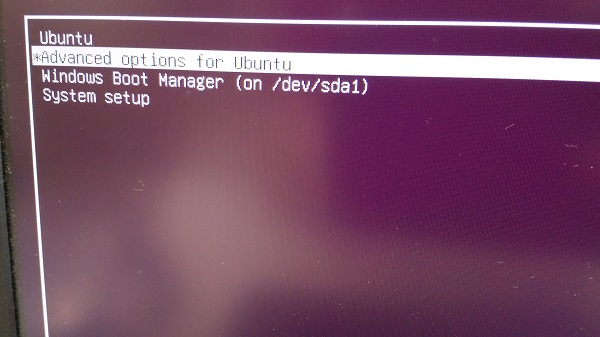
Advanced options for Ubuntuを選択します。
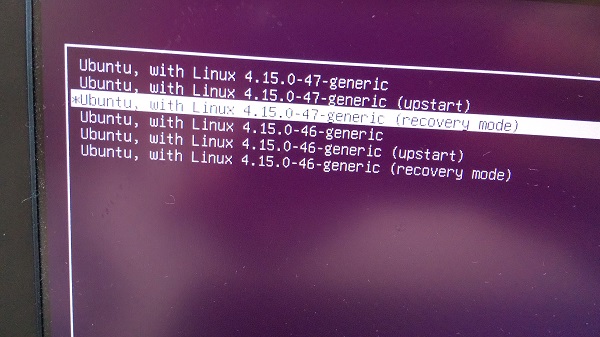
続いて、Ubuntu, with Linux 4.15.0-47-generic (recovery mode)を選択します。
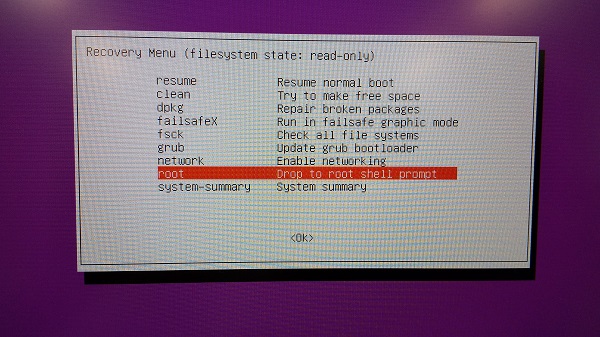
そして少し待つとこのようなリカバリメニューが表示された画面になります。
ここで、「root Drop to root shell prompt」を選択します。

すると下の方にターミナルがでてくるので、Enterを押します。
これで、rootユーザとしてターミナルを弄ることができます。
そしたら、NVIDIAドライバ関連のものをすべて削除し、通常通りNVIDIAドライバをインストールしてください。
【C言語】素因数分解

素因数分解は入門教材に向いているので、高校の時に作ったプログラムを発掘してきました。
標準入出力、if文、配列、for文を使う基本的なソフトです。読んでみてください。
ソースコード
/*---------------------------------------------*/
// 2014/07/22
// Prime factorization
/*----------------------------------------------*/
#include<stdio.h>
int main(void)
{
    int num, i, cnt=0, data[1000];

    printf("Please Input Natural Number : ");
    scanf("%d", &num);
    if( num < 0 ) {
        return 1;
    }

    if( num == 1 ) {
        printf("%d\n", num);
    }
    else {
        printf("%d = ", num);
        for(i = 2; i <= num; i++ ) {
            if( num % i == 0 ) {
                data[cnt] = i;
                num = num / i;
                i = 1;
                cnt++;
            }
        }
    }
    for( i = 0; i < cnt; i++ ) {
        printf("%d", data[i]);
        if( cnt != i+1 )
            printf(" * ");
    }
    printf("\n");
    return 0;
}
コンパイル
$ gcc -o soinsu_bunkai soinsu_bunkai.c
実行結果
$ ./soinsu_bunkai
Please Input Natural Number : 125
125 = 5 * 5 * 5
$ ./soinsu_bunkai
Please Input Natural Number : 1024
1024 = 2 * 2 * 2 * 2 * 2 * 2 * 2 * 2 * 2 * 2
$ ./soinsu_bunkai
Please Input Natural Number : 1254
1254 = 2 * 3 * 11 * 19
【ROS】PublisherとSubscriberの作成
Publisherの作成
$ roscd ros_start
$ mkdir scripts
$ cd scripts/
$ vi talker.py
#!/usr/bin/env python
import rospy
from std_msgs.msg import String

rospy.init_node('talker') #node name

# chatter : name
# String : std_msg Topic [Publisher]
# pueue_size : buffer
pub = rospy.Publisher('chatter', String, queue_size=10)

rate = rospy.Rate(10) #10kHz

while not rospy.is_shutdown(): #loop
    hello_str = String() #make String data
    #writing data (helloworld and time)
    hello_str.data = "hello world %s" % rospy.get_time()
    #publish
    pub.publish(hello_str)
    #loop(because 10kHz)
    rate.sleep()
Subscriberの作成
$ vi listener.py
#!/usr/bin/env python
import rospy
from std_msgs.msg import String

def callback(message):
    # output
    rospy.loginfo("I heard %s", message.data)

rospy.init_node('listener') # node name
sub = rospy.Subscriber('chatter', String , callback) # if reception->run
rospy.spin() # loop and reception
これで完成です。
実行
以下をそれぞれ別のターミナルで実行してください。
$ roscore
$ rosrun ros_start talker.py
$ rosrun ros_start listener.py
[INFO] [1556022065.478649]: I heard hello world 1556022065.47
[INFO] [1556022065.568496]: I heard hello world 1556022065.57
[INFO] [1556022065.668592]: I heard hello world 1556022065.67
[INFO] [1556022065.768532]: I heard hello world 1556022065.77
[INFO] [1556022065.869021]: I heard hello world 1556022065.87
[INFO] [1556022065.968412]: I heard hello world 1556022065.97
[INFO] [1556022066.068923]: I heard hello world 1556022066.07
[INFO] [1556022066.169275]: I heard hello world 1556022066.17
[INFO] [1556022066.268587]: I heard hello world 1556022066.27
このようになれば正常に動いています。
【ROS】ワークスペースとパッケージの作成
ワークスペースの作成
以下はビルドシステムのワークスペースを作るコマンド。
1度実行すれば今後は実行する必要がない
$ mkdir -p ~/catkin_ws/src
$ cd ~/catkin_ws/src/
$ catkin_init_workspace
Creating symlink "/home/atsuya/caikin_ws/src/CMakeLists.txt" pointing to "/opt/ros/kinetic/share/catkin/cmake/toplevel.cmake"
以下、ビルド
$ cd ..
$ catkin_make
・・・略・・・
####
#### Running command: "make -j1 -l1" in "/home/atsuya/catkin_ws/build"
####
bashrcを書き換える
source /opt/ros/kinetic/setup.bash
の部分を
# source /opt/ros/kinetic/setup.bash
source ~/catkin_ws/devel/setup.bash
に書き換える
$ reboot
以下のように表示されれば問題ないかと。
$ echo $ROS_PACKAGE_PATH
/home/atsuya/catkin_ws/src:/opt/ros/kinetic/share
パッケージ作成
・ある程度かたまった機能を持ったプログラムを1つのパッケージとする。
・ROSではすべてのプログラムがなんらかのパッケージに所属
・プログラムを書く前にパッケージを作る必要性
$ cd ~/catkin_ws/src/
以下のコマンドでパッケージのひな型作成
$ catkin_create_pkg ros_start rospy roscpp std_msgs
Created file ros_start/package.xml
Created file ros_start/CMakeLists.txt
Created folder ros_start/include/ros_start
Created folder ros_start/src
Successfully created files in /home/atsuya/catkin_ws/src/ros_start. Please adjust the values in package.xml.
ros_startディレクトリの中に
・CMakeLists.txt
・include
・package.xml
・src
の2つのフォルダと2つのファイルが作成されます。
・コマンド中の「rospy」「roscpp」「std_msgs」は依存パッケージ
・ros_startというパッケージの名前は好きに設定できる
$ cd ~/catkin_ws/
$ catkin_make
この状態で
~/catkin_ws$ roscd ros_start
~/catkin_ws/src/ros_start$
のようにディレクトリチェンジできれば問題ありません。

